Are you getting VAC Was Unable To Verify The Game Session error in CS: GO? Well, Many Counter-Strike: Global Offensive Players are facing the same error.
The VAC- short for the Valve Anti-Cheat system – was a program developed with the simple purpose of combating any such malpractices that make the game zone unfair for players.
It was mainly created for massive games like Counter-Strike: Global Offensive, and so on. It merely overlooked any forms of cheating in the game and blocked players indulging in the same.
However, just as all components, VAC is also one prone to specific errors. As an attempt to bring fairness to the game, the VAC alert can very possibly appear on the screens of people who have not adopted any malpractices at all.

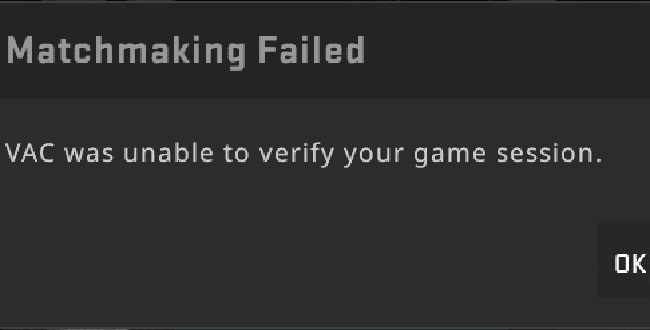
It causes the following words to flash on your screen when you try starting a game: VAC Was Unable To Verify The Game Session
Read Also:
Contents
What Does ‘VAC Was Unable to Verify the Game Session’ Mean?
This error message appears when the VAC system, a mechanism designed to detect cheating in online games, is unable to verify a player’s gaming session. This verification is crucial to ensure fair play and maintain the integrity of online multiplayer games.
When the VAC system fails to verify, the player is often prevented from joining online matches, as the system cannot confirm the legitimacy of their game session.
Common Causes of the Error
- Corrupted Game Files: Missing or corrupted game files can prevent VAC from verifying the integrity of the game session.
- Software Conflicts: Certain software running on the computer, like antivirus programs, can interfere with VAC’s operation.
- Outdated Game or Client: An outdated version of the game or the Steam client can lead to compatibility issues with the VAC system.
- Network Issues: Problems with the player’s internet connection can disrupt communication between the game client and VAC servers.
- Unauthorized Modifications: Any modifications to game files, even if not intended for cheating, can trigger the VAC error.
- Account Issues: Occasionally, issues with a player’s Steam account can cause verification problems.
- System Reconfiguration: Changes in the system’s configuration, like updates or new installations, can sometimes interfere with VAC.
- Background Applications: Some background applications can cause conflicts that lead to the error.
How To Fix VAC Was Unable to Verify Your Game Session
If you are a player who has encountered VAC Was Unable to Verify Your Game Session error without any conscious fault of your own, do not worry. Here are some simple solutions you can try to get rid of the alert and continue with your game:
Method 1 – Log Out of Steam
Sometimes, the most basic solution to an error like this is to log out of your software and log back in simply. It refreshes your data in a way, thus removing any glitch that may have occurred in your game.
It will remove any fault in the configuration and the file management system of the computer. The way to go about doing this is as follows:
Step 1 – To start with, open your Steam application and click on your profile’s name on the title bar (located on the top of the window).
Step 2 – This will open a drop-down menu. Here, click on the words ‘Log Out of My Account’ and follow what is written in the dialogue box.
Step 3 – Close the application using the X in the top right corner and open it again. Enter your credentials on the log in page to access the software.
Step 4 – Check if VAC can identify your gaming session or not.
Method 2 – Repair the Steam.exe
The Steam Client plays a very critical part in the configuration of the program and its association with your computer. Sometimes, damage to its files can give rise to an error like this. To fix this, follow the steps:
Step 1 – Press the Windows key and R at the same time to open the Run Command.
Step 2 – Manually type in words “cmd” in the dialogue box and press Enter.
Step 3 – In the next window that opens, paste this following link and then press Enter:
"C:\Program Files (x86)\Steam\bin\SteamService.exe" /repair
It should take you to the SteamService.exe in your system. If its location is different in your computer, then type the correct one respectively.
Step 4 – Let the repair process be completed. Once done, restart your computer.
Step 5 – Then, open the Steam application. By now, all the necessary updates and downloads will have been completed. If you are asked to enter your credentials and log in, do so.
Step 6 – Check if the VAC Was Unable To Verify The Game Session error continues to occur.
Method 3 – Verify the Integrity of the Game Files
Verifying the integrity of the game files is a crucial practice that you should perform every time you download a new game. It should be done to make sure that all the content required for successfully running the game is installed, hence incapable of causing any disruption while you play. The steps to go about doing this are as follows:
Step 1 – Open the Steam application on your desktop.
Step 2 – Click on the tab that says ‘Library‘. It will display a list of all the games you have
installed via Steam on your system.
Step 3 – From the list, find the game at the start of which you received the VAC alert. Right-click on it, and go to the option ‘Properties‘.
Step 4 – Once the properties of the game are displayed on your screen, go to the Local tab
and click on ‘Verify integrity of the game‘.
Step 5 – Wait for a few minutes until the verification process is complete. Then, restart Steam and open the infected game. Check if you can play it.
Method 4 – Deny Antivirus Access to Game Directory
As mentioned before, it is quite likely that any other application like an antivirus may be utilizing your game files in the background, hence causing the error.
In this case, you can even go to the Settings of your antivirus software and exclude the Steam directory as well as the game files from any uncalled background checks. It will keep your data from being run in two places at once, thus eliminating the error for you.
Read Also:
- ERR_EMPTY_RESPONSE
- Widevine Content Decryption Module
- io.netty.channel.AbstractChannel$AnnotatedConnectException
Conclusion
Everyone deserves smooth and fair game-play without disruptions, and you should be able to achieve yours from one or the other solutions mentioned in the list above.


